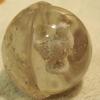
wediscount2 Posted July 21, 2014 Report Share Posted July 21, 2014 Members, Thought I would send some photos of a group of marbles I ground and polished using a rock tumbler. I finished them up about a week ago. I had tried many years ago to tumble some mib's, but I had terrible results. The marbles I used all had some degree of damage, even the Jabo's. It took some doing but I finally got them to look fairly good. What truly amazed me was how good and round they "all" turned out. One friendly word of advice. If you try a rock tumbler, between grit's examine and make sure the grit is finished doing it's intended job before moving on to the next grit size. Have patience, it takes a long time to do a good job. I have a friend who has 4 marbles with the grit used to make it look that way. The grit used is marked on each marble. I will get him to send me a photo of them setting side by side and I'll post it here for edification purposes. Ronnie Link to comment Share on other sites More sharing options...
skycollect Posted July 21, 2014 Report Share Posted July 21, 2014 Interesting for sure! Link to comment Share on other sites More sharing options...
Steph Posted July 21, 2014 Report Share Posted July 21, 2014 surprising Link to comment Share on other sites More sharing options...
lstmmrbls Posted July 22, 2014 Report Share Posted July 22, 2014 rotary or vibratory Link to comment Share on other sites More sharing options...
Gregor Posted July 22, 2014 Report Share Posted July 22, 2014 That is so cool I tried it one time and they all came out cloudy I gave up please explain the grits more and knowing what there job is Link to comment Share on other sites More sharing options...
wediscount2 Posted July 22, 2014 Author Report Share Posted July 22, 2014 rotary or vibratory Galen, It is a rotary and I am going to post here this morning on how I used it as I feel it would be helpful if someone was going to attempt it. Ronnie Link to comment Share on other sites More sharing options...
wediscount2 Posted July 22, 2014 Author Report Share Posted July 22, 2014 Galen, It is a rotary and I am going to post here this morning on how I used it as I feel it would be helpful if someone was going to attempt it. Ronnie Bought this tumbler at a flea market. It was new, never used. I like it a lot. It is very quiet and it never leaked a drop of slury while I used it. It will do about 100 marbles each grind & polish. It's best to reduce the size of big chips with the dremmel tool. If you don't marbles tumbling will get into the chip and start dishing it out creating a valley. In other words it will turn a chip into a big smooth valley. Not really necessary to dremmel small chips. The tumbler will do that for you. I had 6 marbles that had at least one good size chip on it. I took a grinding stone and using a dremmel tool, I went around the perimeter of the chip starting appr. a quarter inch away from the edge of the chip and raising the tool up to the marbles chip edge. Do this all the way around the marble. Don't worry about the flat grooves the dremmel leaves as the tumbler will straighten all that out. Also don't worry about the wheel busting the marble as it will not do so. After grinding let the marble naturally cool down to ambient temp., usually a minute or two. Also wear a mask or do it outside and let the wind carry the glass dust away from you. DO NOT BREATHE THE DUST!! To begin the tumbling put your marbles in the tumbler and add enough water to fill the drum about "HALF FULL". Then put in 2 decent tablespoons of 60-90 grit. Although quiet I turned my machine off at night. I let it run 3 days or about 30 hours. I checked my work once during the 3 day rough grind. (after 10 hours). Every thing looked real good so I finished out the 30 hours. I felt it was time for the next step, the 200 grit. I washed the drum and marbles real good after the 60-90 run. Put the marbles back in the drum, put in water to bring it up to half way full, then I put 2 decent tablespoons of 200 silicon carbide grit. Again I let this run for at least 30 hours. Now this is important. The 200 step is the most critical of all steps. If you do the 200 proper I can assure you the marbles will polish out with a decent lustre. (2 more steps to go after the 200). Tired of typing, taking a break, will post later the final 2 steps, the 600 grind and the cerium oxide polish. Also on my polish I forgot to put in a teaspoon of dish soap. A couple of people that do this frequently told me the soap makes for a high gloss polish. (suppose to add the soap 8 hours before they are done). Ronnie Link to comment Share on other sites More sharing options...
wediscount2 Posted July 22, 2014 Author Report Share Posted July 22, 2014 That is so cool I tried it one time and they all came out cloudy I gave up please explain the grits more and knowing what there job is Each grit reduces the size of the "crater" left by the previous grit by a great percentage. The 60-90 grit leaves thousands of small craters. The 200 grit removes these craters but in turn creates it's own craters. The 600 grit will remove the 200 grit craters, and leave the very outer glass surface ready to accomadate a nice high lustre final polish. The 600 grit will also leave micro craters but the cerium oxide working in conjunction with friction will ultimately diminish the craters requiring a strong loupe to detect them. Ronnie Link to comment Share on other sites More sharing options...
MarbleDawg86 Posted November 5, 2014 Report Share Posted November 5, 2014 Ronnie, sent u a private message. Link to comment Share on other sites More sharing options...
kbobam Posted November 5, 2014 Report Share Posted November 5, 2014 Great stuff! Thanks for sharing your experience! Link to comment Share on other sites More sharing options...

Recommended Posts
Create an account or sign in to comment
You need to be a member in order to leave a comment
Create an account
Sign up for a new account in our community. It's easy!
Register a new accountSign in
Already have an account? Sign in here.
Sign In Now